Citrix Cloud - My Machines Are Shutdown
Citrix Optimizer - DO NOT REMOVE THE STORE
So I bet you are wondering why?
So there's a bug. You may never encounter the bug. But if you do, then you will regret removing the Windows Store.
Let me start by saying, the Citrix Optimizer is by far one of the best around. I use it even when I'm not optimizing for Citrix. However, if you are using it on a Windows 10 machine then it will likely try to optimize by removing the Windows Store. DO NOT LET IT!!!
What should you do? Remove all other apps and use a GPO to disable the Windows Store.
What happens if I remove it? Well, the symptoms are pretty widespread, and unfortunately opening a ticket may not lead you to this conclusion.
What I've seen in the field is this: Customer has OneDrive files on-demand GPO in place and customer is using Office 365 with SSO. If OneDrive loads first, then Office prompts for credentials no matter what. It will literally never SSO. If the customer turns off files on-demand GPO, then the SSO works properly.
If you reinstall the Windows Store (it is a pain to do as you must use the Inbox Apps iso), then the SSO and OneDrive files on-demand all work fine.
So that means to me, just don't remove it. Yes, you've heard it helps to reduce login times. However, that is still true if you remove all the apps and only keep the Store.
You can "Turn off the Store" via GPO and remove the ability to use it. But at least it is still there for when random odd things like the above occur.
FSLogix + Citrix App Layering
After pounding my head against the wall a few times, I figured I might save others the same frustration.
What happens?
You set up Citrix App Layering.
You set up FSLogix.
You create a published image.
App Layering is working great. You see the FSLogix VHDs getting created. However, no profile data is being saved. Basically, you get an FSLogix VHD completely formatted with no data.
Why is this happening?
Fun times in Microsoft world?!?! No, not funny?? Ok, so ultimately, it is all a matter of timing. The app layering driver is called prior to the FSLogix driver in an order that Microsoft calls Altitude. The prevent this from occurring in that order, you have set the altitude for FSLogix to occur before App Layering.
Yeah ok, How do I fix it?
Open up the layer, you installed FSLogix on
HKLM\System\CurrentControlSet\Services\frxdrvvt\Instances\frxdrvvt\Altitude
Set the value 138010
Then reboot the machine.
Yeah, if you banged your head against the wall, then join the club. If you found this post, then it was my pleasure to save you the pain.
Citrix App Layering
So if you haven't had an opportunity to work with Citrix App Layering, then you should totally check it out. This particular product was acquired by Citrix when it purchased Unidesk a few years ago. Since then, the original product has definitely evolved. At the time of this blog, Citrix App Layering is at version 4 and the appliance can be deployed to most of the common backend hypervisors.
Overview
Citrix App Layering allows an organization to separate the typical image into separate parts: Platform, OS, and Applications; which creates management separated from the infrastructure. This allows the management of updates to be separate and once finalized created a whole image. For more information on Citrix App Layering, head over to Citrix Docs. I won't go into details regarding deploying the appliance as that information is within the Citrix Docs.
Working with Citrix App Layering
So as you may already know, I build images onto of XenServer. This is intentional as it is easier to package Citrix on top of Citrix versus the other hypervisors. Basically, I've seen less driver compatibility with XenServer than other hypervisors. However to work with Citrix App Layering, the hypervisor you choose really doesn't matter when you are creating these layers.
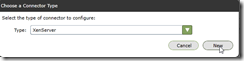
In order to begin, you will create an OS Layer. You can create multiple OS Layers based on the Operating Systems used within your organization ie. Windows 2012 R2 and Windows 2016. So let's login and take a look at App Layering. Important note: Citrix App Layering is not supported inside of Chrome due to Silverlight . As a workaround, I use IE Tab inside of Chrome. Once you navigate to your App Layering appliance, you will see the login screen.
Select Layers->OS Layers
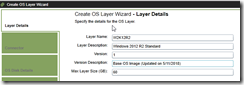
Create OS Layer. Give it a simple Layer Name and provide a description (avoid periods if using PVS). I would start with version 1 and a version description of something like “Base”. You can leave the Max Layer Size as 60GB.
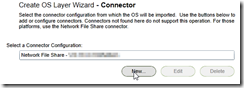
If this is a new appliance deployment, then you will likely only have a network file share option. If you click New, then you can select your backend platform. For the purposes of this blog, it will be XenServer.
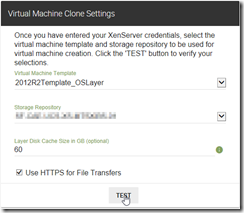
A new window will open for you to configure your XenServer Connector. Give a Config Name like “XenServer-HostName or PoolName”. You will want to fill in the information from left to right. Please note: You need to have at least one virtual machine template inside the pool/host selected without a virtual disk attached. You can use a hostname or ip address for the XenServer Address. Enter the credentials for the host/pool. I always choose to ignore the certificate errors and select “Check Credentials”.
Once the credentials are verified, then you can select the template for the OS Layer. For selection of templates (PVS only), make sure that your OS layer and Platform Layers match or at least the OS Layer CPUs are larger than the ones specified via the Platform Layer. After you’ve entered the appropriate information, then select Test. Then Save.
The next screen, you must select the OS Disk Virtual Machine. If you click Select Virtual Machine, then it will open a new screen for you to select a VM within the Pool/Host.
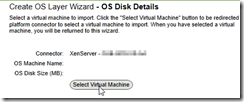
After you select a virtual machine, the screen updates with the OS Machine Name and Disk Size.
You can select an existing icon or if you have your own icon you’d like to use then you can select Browse.
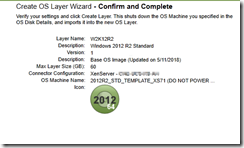
The last screen gives you a summary of your selections. If everything looks good, then select Create Layer.
To be continued….
Upgrading 2008R2 PVS Image to Windows 2016
Use the P2PVS or XenConvert Wizard to copy the disk to a hard drive.
So now that you have a method of being able to boot directly to the PVS image without networking, let's talk about getting the image upgraded to 2016. If only it were as simple as just sticking the CD in and letting it run. Well it is, SORT OF. So the first thing you want to do is uninstall any anti virus software, VDA, PVS Target Device. You want to make sure your tools are up to date as well. After you've made sure everything is uninstalled. MAKE A SNAPSHOT. If the upgrade goes left, then you do not want to have to redo the image copy again.
Insert the Windows 2012R2 CD. Why not 2016? See my previous blog regarding upgrading to 2016. Click Install. You can skip the updates unless you just like wasting time. 😀 Click to Upgrade. Do all the unnecessary EULA stuff and allow the OS to upgrade. This may take up to an hour depending on how much software is on the image. The only thing worth noting during this process is that my Windows 2012 R2 installation kept reset after the "Setup is starting" screen. It would go back to the original click "Install" window. This ended up being an issue with Windows not knowing where to put the temp files. So I ran the following from the command line:
C:\$WINDOWS.~BT\Sources\setup.exe /runlocal /BTFolderPath:C:\$WINDOWS.~BT /OSImagePath:"D:\Sources" /uilanguage:en-US /targetlanguage:en-US /tempdrive:c
After the installation is complete, I would recommend running all the software that was on the original image. Verify that everything works. If Office was previously installed, then the first run will likely rerun the config wizard just to put back all the pointers and classes within the registry. I wouldn't worry about that part too much unless you are stopping at Windows 2012R2. Once you have verified that Windows 2012R2 is solid, then proceed with running a disk clean up to remove the previous Windows Installation from the OS. Once disk clean up is complete, reboot and you guessed it MAKE ANOTHER SNAPSHOT.
Now insert the Windows 2016 installation CD. Again, you can skip the updates. Skip through the EULA stuff, select to Keep Settings and Files. After this, Windows will "make sure you're ready". They are so nice, right!!! Once this part is complete, then you may receive a screen which lets you know if there's anything that might not convert over. You will have to confirm each item. The last thing will be a warning that this method is not supported. Remember my disclaimer??? You can confirm this as well. You will then get the green light to install. After the upgrade is complete, you will follow the same process as with the 2012R2 Upgrade. Verify all of the software still works. Run disk clean up. MAKE A SNAPSHOT.
For our environment, some of our VMs have GPUs attached. Typically, you can jump from 2008R2 to 2012R2 with no driver issues. However, moving from 2012R2 to 2016, you will likely need to update the graphics drivers. You will want to make sure to do this before installing the VDA agent.
Once the vDisk has been copied, shutdown your VM and switch the PVS Device to Boot to vDisk instead of Hard Disk. Power up the the VM again. It should boot to your new 2016 PVS vDisk. If this is successful, then power the machine back off. Remove the snapshots. Remove the HD with 2016. Power the machine back on and ensure there are no ghost devices.
You want to remove any devices which are hidden/inactive devices prior to installing the VDA. For the ghost nics in Xenserver, I would suggest removing them through the registry using something like PSEXEC. It is a lot easier and cleaner. I've seen where removing them using device manager causes you to have to rerun XenTools to get the NIC to not keep assigning APIPA. If you run regedit as system using PSEXEC (psexec -i -s regedit), then you can remove the extra NICs. I've never seen any issues with using this method and I've used it for years now. If you take a look at the example, then the first two NICs represent the valid NICs in device manager. But 2 - 9 Keys are not valid as the properties are empty so those keys can be removed. If you remove them and refresh device manager, then you will notice that the ghost NICs disappear.
Reverse Imaging a PVS Target Device
- Boot the VM
- On the Data Drive, copy the VHDX file to the drive
- Open up command prompt
- bcdedit /export c:\bcdbackup
- bcdedit /copy {default} /d "PVS Image"
- bcdedit /set {guid} device vhd=[drive letter:]\SomeFile.vhdx
- bcdedit /set {guid} osdevice vhd=[drive letter:]\SomeFile.vhdx
- Restart the Machine
- Select PVS Image
- Perform your updates
- Update Xen/VM Tools
- Perform Driver Installs
- Update an old version of PVS Target Device (pre 7.6 Update 1)
- Upgrade to 2012R2, 2016, 2019
- Restart the Machine
- Select Regular VM
- Copy VHDX file back to PVS
Upgrading from Windows Server 2008R2 to ?????
If you are on a virtualized platform, then I totally suggest the BCDEdit method of upgrading a Citrix PVS Image. It is literally the easiest method since booting directly to the PVS image by using NFS or CIFS as an SR. If you want more information on the BCDEdit process, then I'll be posting one soon on the subject.
Netscaler Upgrades - GOTCHA
https://www.techdrabble.com/citrix/netscaler/23-check-netscaler-license-expiration-information-quickly-via-powershell
I'll post more tonight after I've done the upgrade.
[5 hours later]
So it was not as bad of an upgrade as I would have thought. I will post some screen shots on Monday. But some observations, VPX 11.0 actually did some weird things using the GUI upgrade method. I transferred the firmware on to the appliance within the nsinstall folder. But inside the GUI, it tried to append additional folder paths that didn't exist. This did not occur during the upgrade on the MPX.
Another observation is opening the GUI right after presents strange formatting. So remember to either clear your cache or close your browser windows after you do an upgrade. You will think you messed something completely up when you log in and the formatting is all over the place.
Another gotcha was we use some customization within the VPN portal. We added a placeholder for the user name field. This did not copy over. It gets overwritten during the upgrade. So if you've made any changes within the vpn/js folder, then you'll want to make sure you back it up.
Also, the SSL certificates are now structured differently. Don't have a complete panic when you upgrade and only a few of your certificates are listed. This is because the new SSL>Certificates only lists Server certificates. To view your CA certificates, then you go to SSL>CA certificates. I had a minor panic moment, but all is well. If you request that the machine reboot after a successful upgrade, then you will not get to see the success of the upgrade. You will just suddenly not get any feedback on the screen and it will appear stuck. Just refresh and you'll see that the appliance is down.
Some other things that are interesting about this version are the favorites! We all have the same sections we visit frequently inside the Netscaler GUI. Well now you can favorite those sections and quickly jump to them. Also, the interface is quite sleek. If you've already used Netscaler MAS 12.0 then you'll be familiar with the layout. I also like the check for updates section. I do not like the fact that clicking on node in HA will open the node for editing. Actually clicking on any item inside the interface opens the item instead of just selects it. I'm so used to clicking the item to select it and then clicking Add or Edit. I like to select an item and then select Add because it duplicates the item allowing for edits to create a new item.
The "new" Adaptive TCP feature definitely seems promising. This was available in 11.1 starting with build 51.21, but was recommended that you at least be at 11.1 build 55.10.
Other requirements for Adaptive TCP (taken from Adaptive Transport Product Documentation):
- XenApp and XenDesktop: Minimum version 7.16.
- VDA for Desktop OS: Minimum version 7.13.
- VDA for Server OS: Minimum version 7.13.
- StoreFront: Minimum version 3.9.
- Citrix Receiver for Windows: Minimum version 4.7 (EDT and TCP in parallel require minimum version 4.10 and Session Reliability).
- Citrix Receiver for Mac: Minimum version 12.5 (EDT and TCP in parallel require minimum version 12.8 and Session Reliability).
- Citrix Receiver for iOS: Minimum version 7.2.
- Citrix Receiver for Linux: Minimum version 13.6 for Direct VDA Connections only and minimum version 13.7 for DTLS support using NetScaler Gateway (or DTLS for direct VDA connections).
- Citrix Receiver for Android: Minimum version 3.12.3 for Direct VDA Connections only.
- IPv4 VDAs only. IPv6 and mixed IPv6 and IPv4 configurations are not supported.
Upgrading VCSA 6.5 to 6.5U1
If you are unfamiliar with the upgrade process, then VMware has been so kind to give us a chart.
https://kb.vmware.com/s/article/2147289
But the biggest gotcha to point out here is you have any PSC (Platform Services Controller) or SSO external appliances, these MUST be upgraded first. Do not get burned here and mess up your entire environment.
The entire upgrade took about 45 minutes where there were 2 geographical data centers with 2 linked instances of VCSA and 1 PSC.
I suggest using the web portal for the entire upgrade process [https://your_vcsa_or_psc:5480]
I did a full backup of the 2 VCSAs and PSC. I also took a snapshot for good measure. Took a few minutes for the download of the updates. After the updates are complete, you will notice your inability to manage anything through that VCSA. The VCSA will not reboot on its own.
Once the VCSA is rebooted, you may notice unknown health status when you login. This is caused by your browser cache so don't be alarmed. Just clear your cache and you should see all greens.
All in all, this was not a bad upgrade at all. Just make sure you take a look at the upgrade sequence as to not be up all night trying to unfubar your environment!!!
If you receive vSphere HA host status errors from any of the hosts after the upgrade, then it may be necessary to disable HA at the cluster level, then re-enable HA. You can follow several different forums for removing affected vibs or uninstalling the FDM agent. But ultimately, the fix for us was to disable/enable HA at the cluster.
If you are using other things like Site Recovery Manager or vSphere Replication, then make sure you upgrade those as well in the proper order. When upgrading the vSphere Replication appliance, make sure to shut the appliances down, then power them back on. This will ensure that any configuration changes that occurred during the upgrade are propagated to the appliance. Once your vSphere Replication servers are upgraded, perform the upgrade on your SRM servers. The biggest thing to remember in the upgrade process is to not make any changes especially to the objects identified within VCSA. If you make this mistake, then you will have to remove the installations from VCSA. I once made the mistake of renaming my vSphere Replication name. This messed up SRM completely. I had to redo the installation in order to get it working again.
Well it's been real folks!!! Until next time!!!
Optimizing VMware vCenter Converter
- This should be an automatic, well duh!!! Installing the converter locally onto the VM or physical machine will always perform faster than running it from a Converter Server. However, this limits you from being able to shut the source machine down after the converter completes.
- Pros
- Faster than any other method unless importing it via OVF in which case why are you reading this article??
- No additional credentials to pass other than the one to the VMware infrastructure
- Cons
- Additional network security needed. This requires that the VM or physical hardware have access to the vCenter server and hosts. If you have a large network or a bunch of firewall rules, then this could be a pain.
- Requires you to install the full version of the software and add additional tweaks for performance before converting.
- Requires babysitting because you cannot use the tool to shutdown the machine after the final sync.
- With a bunch of data to migrate (500GB+), this is definitely my favorite option.
- Using this method means that you don't have to worry about settings getting messed up. You simply set your favorite settings and then allow people to use the server to connect to all the VMs that need to be converted. This method creates a centralized management approach to all P2V and V2V projects.
- Pros
- Centralized management
- Running logs of all previous conversions
- One server to introduce to your firewall rules
- Cons
- Not as fast of speeds that can be seen when the tool is run locally
- Can sometimes fail more often due to the extra hops
- Two credentials are needed, one for the server and one for the VMware environment
- With 500GB or less, this is the best option for doing multiple migrations at once and having a centralized place to monitor the progress.
- Set Data connections per task to Maximum [This allows multiple drives to copy at once]
- Turn off SSL for the Worker service
- Go to C:\ProgramData\VMware\VMware vCenter Converter Standalone
- Edit the converter-worker.xml
- Find this line <useSsl>true</useSsl> and change it to false
- Save the file and restart the worker service.
- In another blog, I talked about things to do when converting from Xen to VMware.
- Make sure that all network connections are solid
- If there's a 500GB disk and only 50GB of disk has data, then consider using file copy instead of block copy. Only use file copy when a good majority of the disk is free space otherwise you will hate yourself.
XenServer to VMWware Migration
DON'T UNINSTALL XENTOOLS!!!!
Ok, let's back up and explain why they say you should uninstall the tools. There's really only one primary reason for doing so...DRIVERS. By uninstalling the tools, you force the VM to install the normal Windows drivers for the hardware and OS that it is sitting on. With the tools installed, you have all the Xen drivers which help it do things like Xenmotion or safely shutdown/restart the OS.
So I'm sure you are still waiting for me to tell you why you should actually keep XenTools installed on the VM. Well if you've ever used VMware Converter to convert a machine and you've uninstalled the tools, then you likely saw the migration dip to lightning speeds of 1KB/sec. On a VM with upwards of 100GB of data, you will be able to go get dinner, walk the dog, build 3 hosts, and possibly take a mini vacation before the VM is done. In the field, we saw a VM with about 500GB of data take a week to do the first initial synchronization and this was after it failed twice. The reason for the slowness is because the native drivers do not give the same speeds. In our environment, it was a difference between 100Mbps vs 1Gbps.
Are there any downsides? Well sort of. Initially, we would create a conversion job and set the job to not run the final synchronization. This would allow us to uninstall the tools right before the final synchronization job. However, this caused another problem later because the job would no longer start because it detected to many changes to the OS. So we tried not uninstalling the tools at all and just running the conversion all the way through with XenTools installed. What happened? Nothing but greatness. We were able to convert a 500GB VM from Xen to VMware in a matter of a few hours.
But things to note:
- Do not tell the conversion wizard to install VMware Tools.
- Do not install VMware Tools before uninstall XenTools.
- You MUST uninstall XenTools on the first boot of the VM otherwise you will get a BSOD (not the end of the world)
- You MUST uninstall all of the devices that are Xen related from Device Manager
- Open command prompt as administrator
- Type set devmgr_show_nonpresent_devices=1
- Type devmgmt.msc
- Show hidden devices within Device Manager
- Look for anything Citrix or Xen and remove.
- DO NOT REBOOT until you have removed all Xen items. If you do not, then you will get a BSOD (again not the end of the world)
- After you've removed all Xen items, then reboot and verify you don't get a BSOD (see what to do when you get a BSOD)
- Install VMware Tools
- Fix your network configuration
- Jump for Joy
Citrix Workspace Single Sign On Woes
In today's world, your security team is probably constantly pushing for settings to secure the environment. This may come from any vend...
-
In today's world, your security team is probably constantly pushing for settings to secure the environment. This may come from any vend...
-
By the title alone, most of us cringe at the topic or idea. The reverse imaging process for a PVS target device has greatly evolved over the...